Usage
Info
Under development! This page is missing:
- Instructions to create a protocol using Newt (or PLR).
- Instructions to run a protocol and troubleshooting.
- Usage restrictions (related to design rationale, functional specification and working principle items).
- Video GUI (create a virtual workspace, add platforms to the workspace, create a protocol).
Requirements
To follow this guide, the machine needs to be ready to run, with every part installed and calibrated.
Depending on how you got your robot (e.g. if you are building it from scratch or have bought a parts kit from a provider), you may need to follow some additional steps before using it.
If you've started from a kit, you need to have gone through the following guides first:
If your robot has already been built and configured, but not calibrated, you need to go through the calibration guide:
If your robot is ready to run, and your tools and platforms are calibrated, you can proceed with the instructions below.
Features and Limitations
TODO
Content due soon: Pipettin Bot Features and Usage limitations.
For now, check out the main page and technical overview page.
Walkthrough video
TODO
Content due soon: Video (create a virtual workspace, add platforms to the workspace, create and run a protocol).
There are several videos for older versions of the software and hardware. Please ask for links to them in the Discord server.
Access
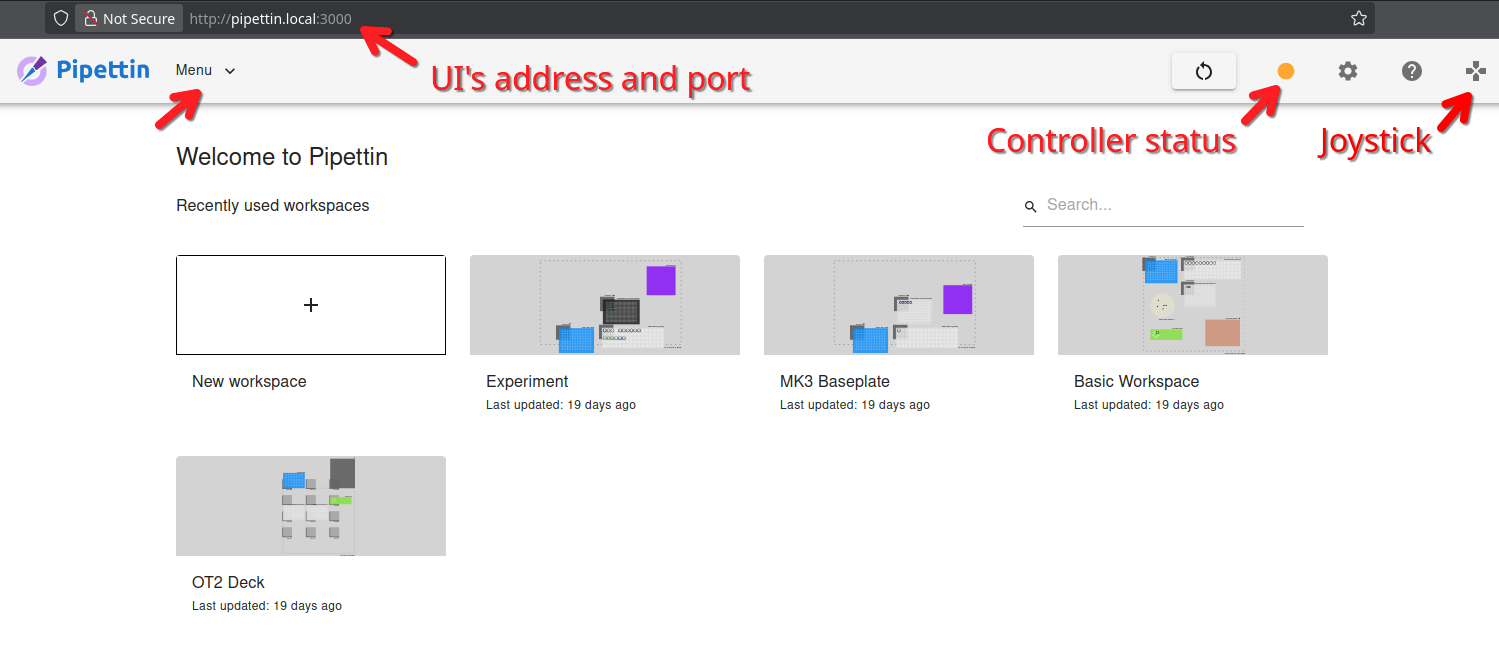
To get started, you will need to obtain the robot's network address, required to access the robot's applications.
The procedure is described in detail in the headless network setup, and is part of the full Software Setup guide.
Common cases:
- If the UI is running on a remote computer (e.g. the robot's RPi) the URL will consist of it's IP followed by the UI's port (e.g.
http://<your_pi's_ip>:3000) and may be accessible through its mDNS addess as well (http://pipettin.local:3000). - If instead you are running the software on the computer you are browsing on, try visiting http://localhost:3000.
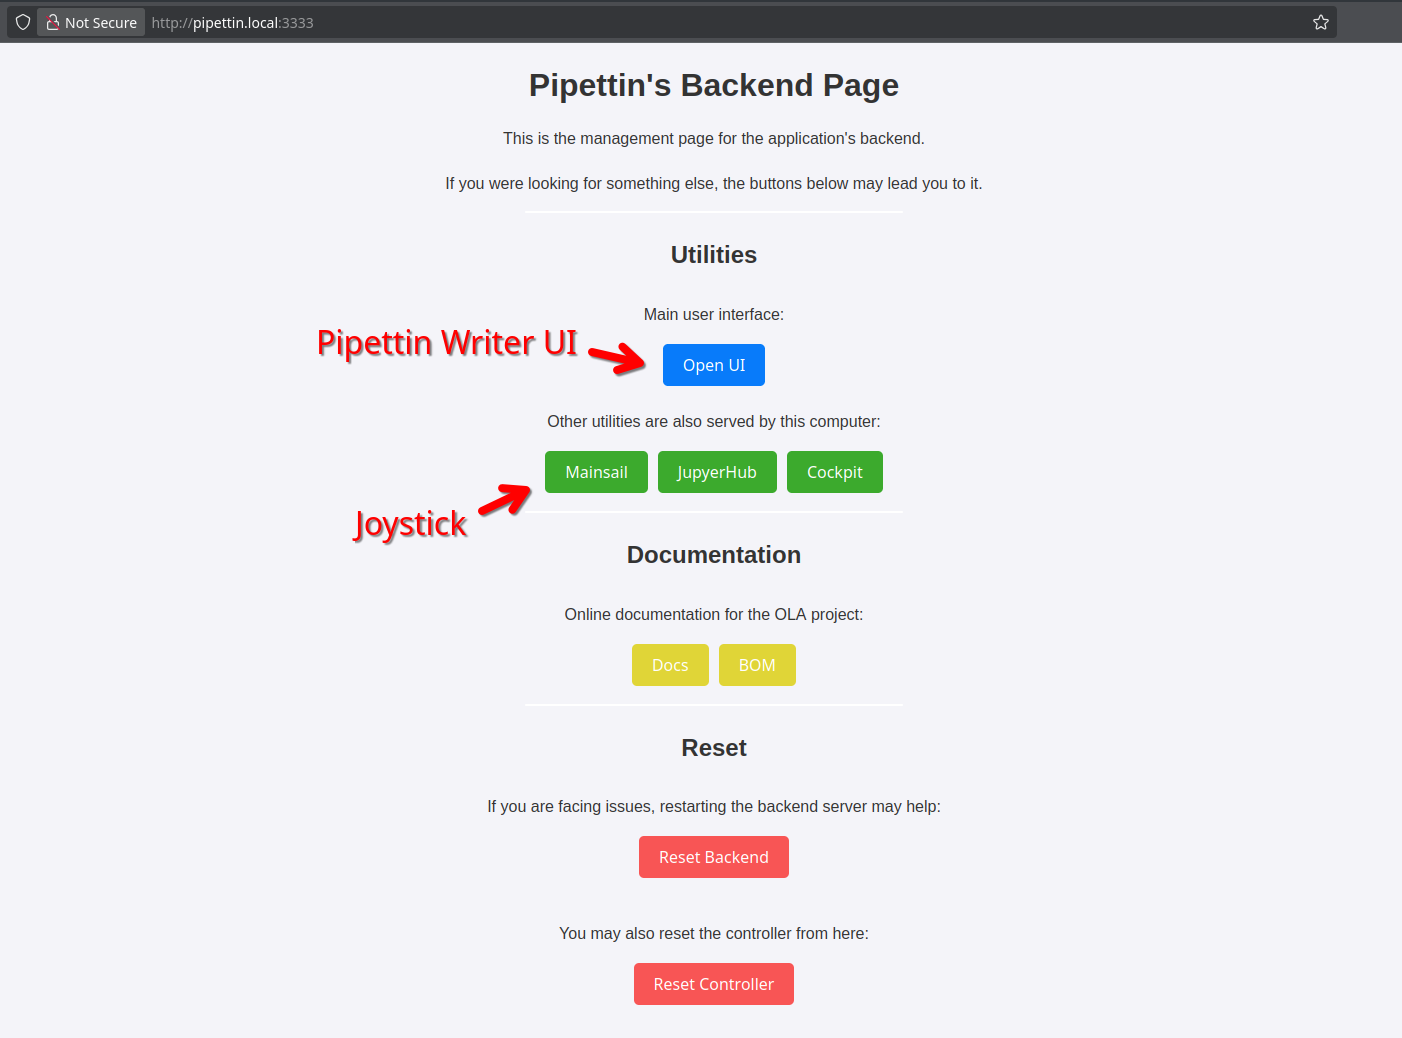
Once known, you can use the address to access all applications, including the Pipettin Writer UI and the Joystick. These are served under the same address, but on different ports, as listed below.
Screenshots: Main UI, backend, and Joystick pages
Help! I can't find the address
If you do not know your Pi's IP yet, follow the relevant section of the Setup Guide.
Ask for help or report errors by creating an issue here or joining our discord server.
HTTP only
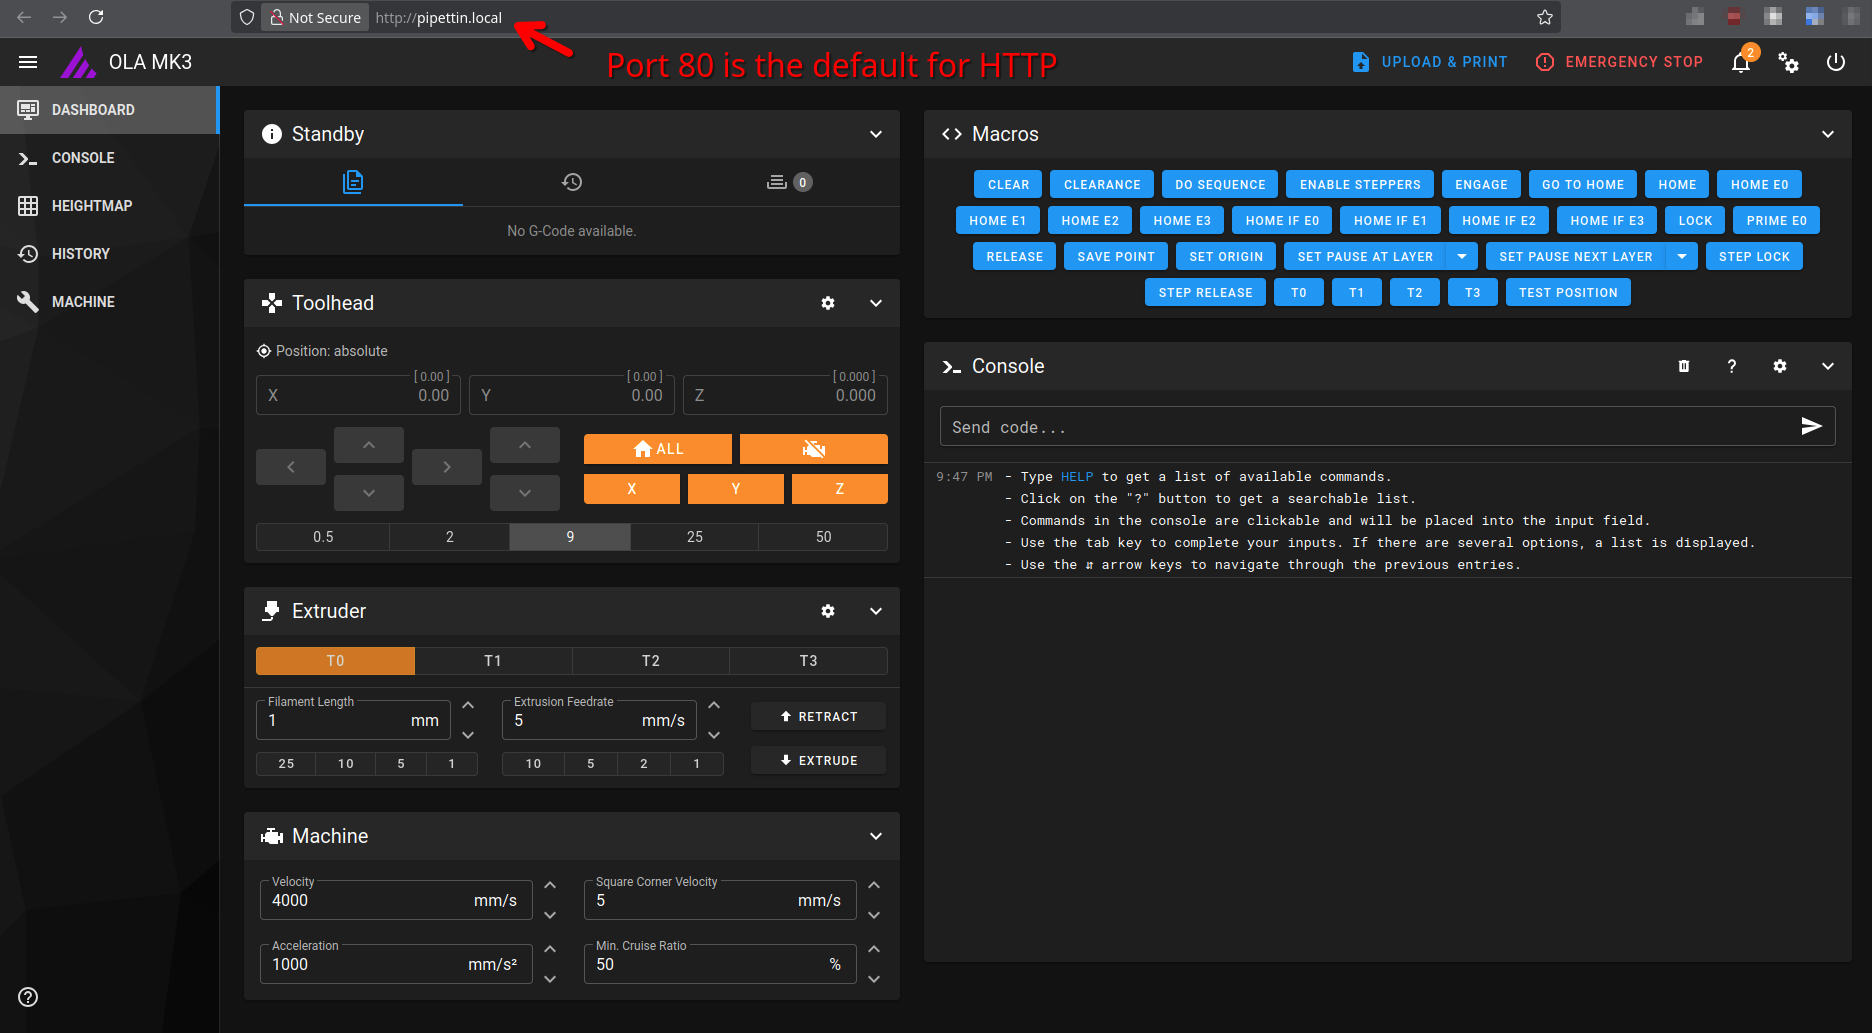
Remember to use http to access these pages, and not https. HTTP encryption is not yet enabled, and is suitable for access in trusted local networks.
Advanced: connect to a remote instance of the API
The UI is also available through GitLab pages, and can connect to a local instance of the API after configuring it's address on the settings page.
Applications
The robot can be used through several applications:
| Application | Port | Description |
|---|---|---|
| Pipettin Writer | 3000 | 📝 Friendly web interface for creating and running protocols. |
| Mainsail | 80 | 🕹️ Machine control "joystick". |
| Backend page | 3333 | 🤖 Backend API and links to the main applications. |
| JupyterHub | 8000 | 📚 Electonic python notebook server. |
| Cockpit | 9000 | 📊 Linux system management web application. |
Note that port 80 is the default HTTP port. It is implicit (not shown) in the URL when opening a URL without explicitly choosing a port.
Manual control
The robot can be controlled manually through the Mainsail application, which we mainly use as a "joystick" to move the robot, configure it, and calibrate it.
Workspace setup
First some definitions:
- A workspace is a virtual representation of the deck, where the robot will perform its actions.
- A deck is a collection of physical objects placed on particular positions of the baseplate.
These objects, usually called "labware", can be tip racks, tube racks, or any other object that you want to use with the robot.
Digital twins
The relative placement of labware on the baseplate must correspond with the position of virtual objects in the GUI's workspace.
As such, the workspace is meant to be a digital twin of the deck and its state, and must be aligned with it to work correctly.
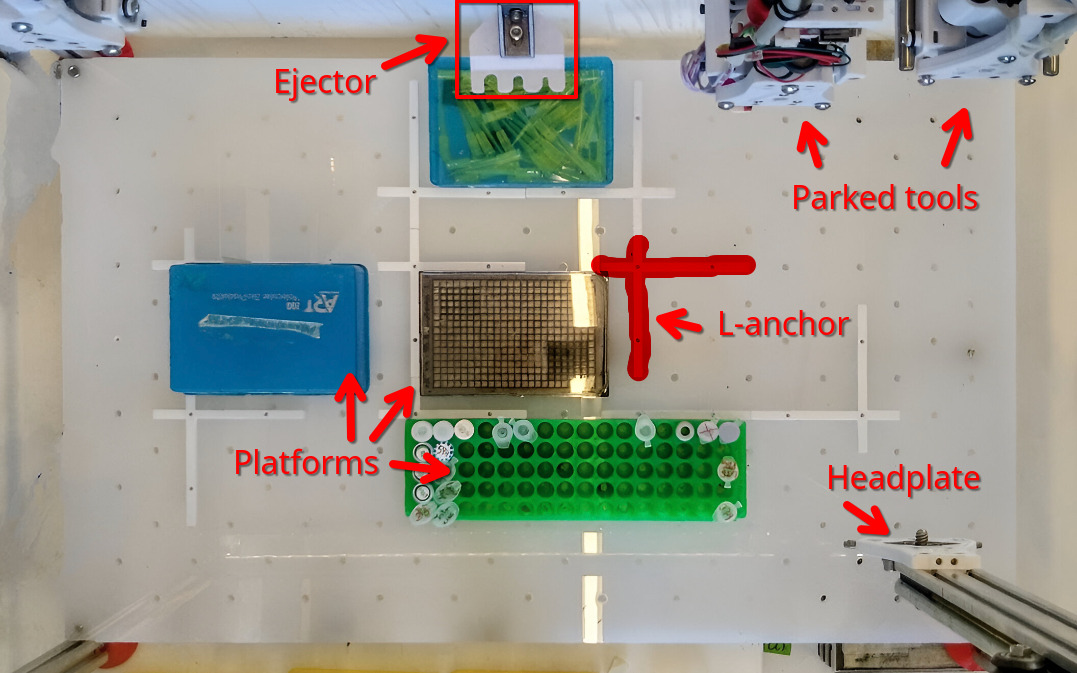
Place physical objects
The basic idea is to place objects along the 3D-printed anchors. These are meant to be used as "curbs", such that you can move objects around and still put them back easily, precisely and repeatably at the same position.
The basic anchors come in 2 types: straight and L-shape. The straight anchors are meant to be used to extend the the L-shape anchors, meant to be used as "corners". These these can be combined to form larger shapes.
Procedure:
- Install the baseplate on the strucutre (if not there already).
- Make sure that the heads of the 3 screws under the baseplate are correctly aligned with the slots one the aluminum profile. It must sit in place firmly.
- Place some anchors on the baseplate.
- Try to form corners at different places. This shape will be useful to align objects in the next step.
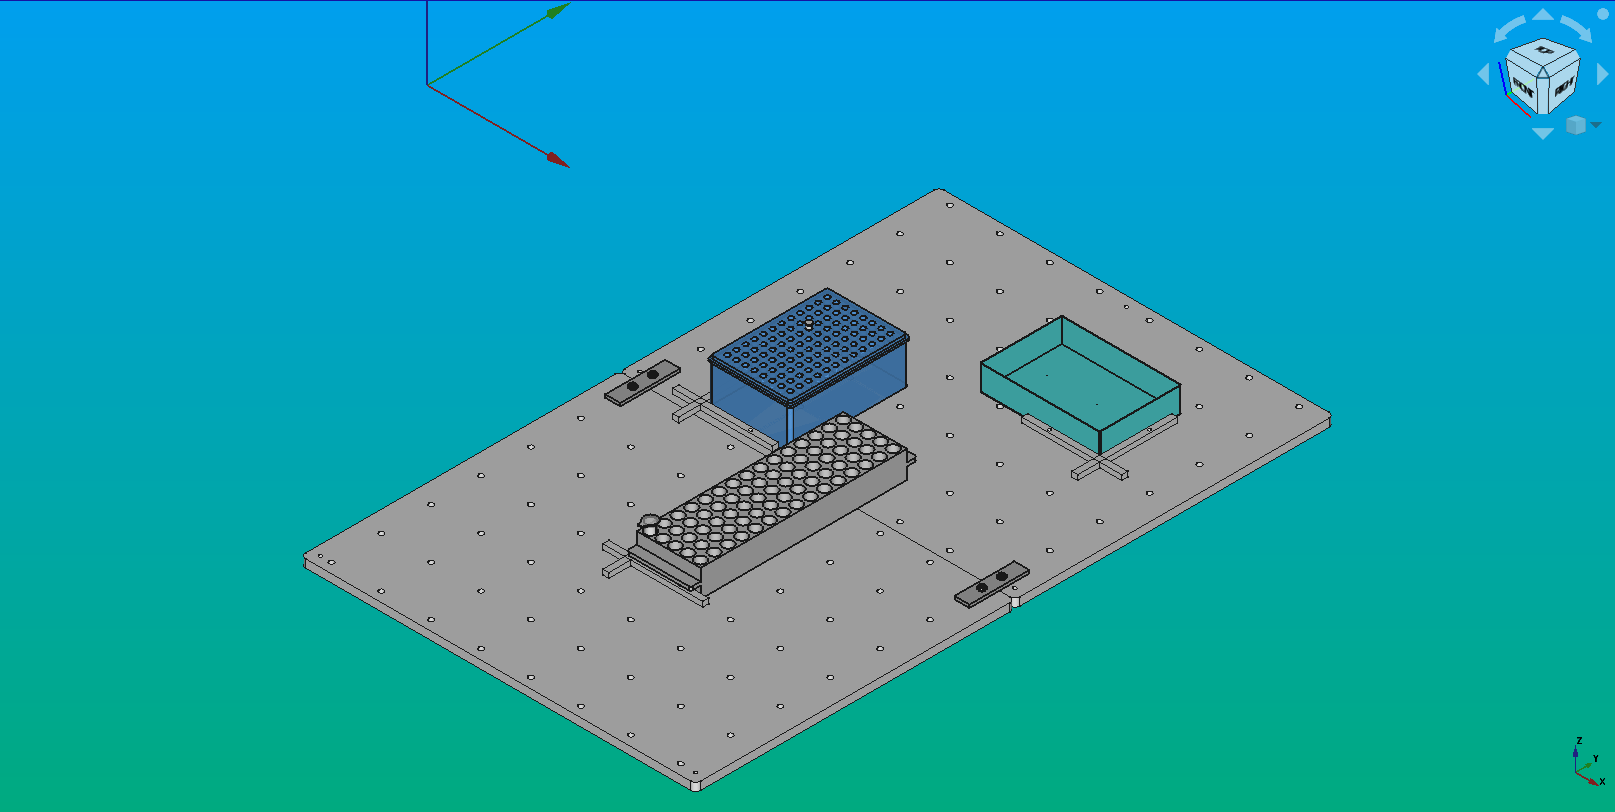
- Place your objects on the baseplate, aligning them to the anchors.
- For example:
- One p200 tip rack with tips.
- One tube rack with some tubes.
- For example:
- Place a "discard tray" just below the tip-ejection post.
- If using a pipette with a built-in tip ejector, place a trash container somewhere else.
Anchors on the baseplate:
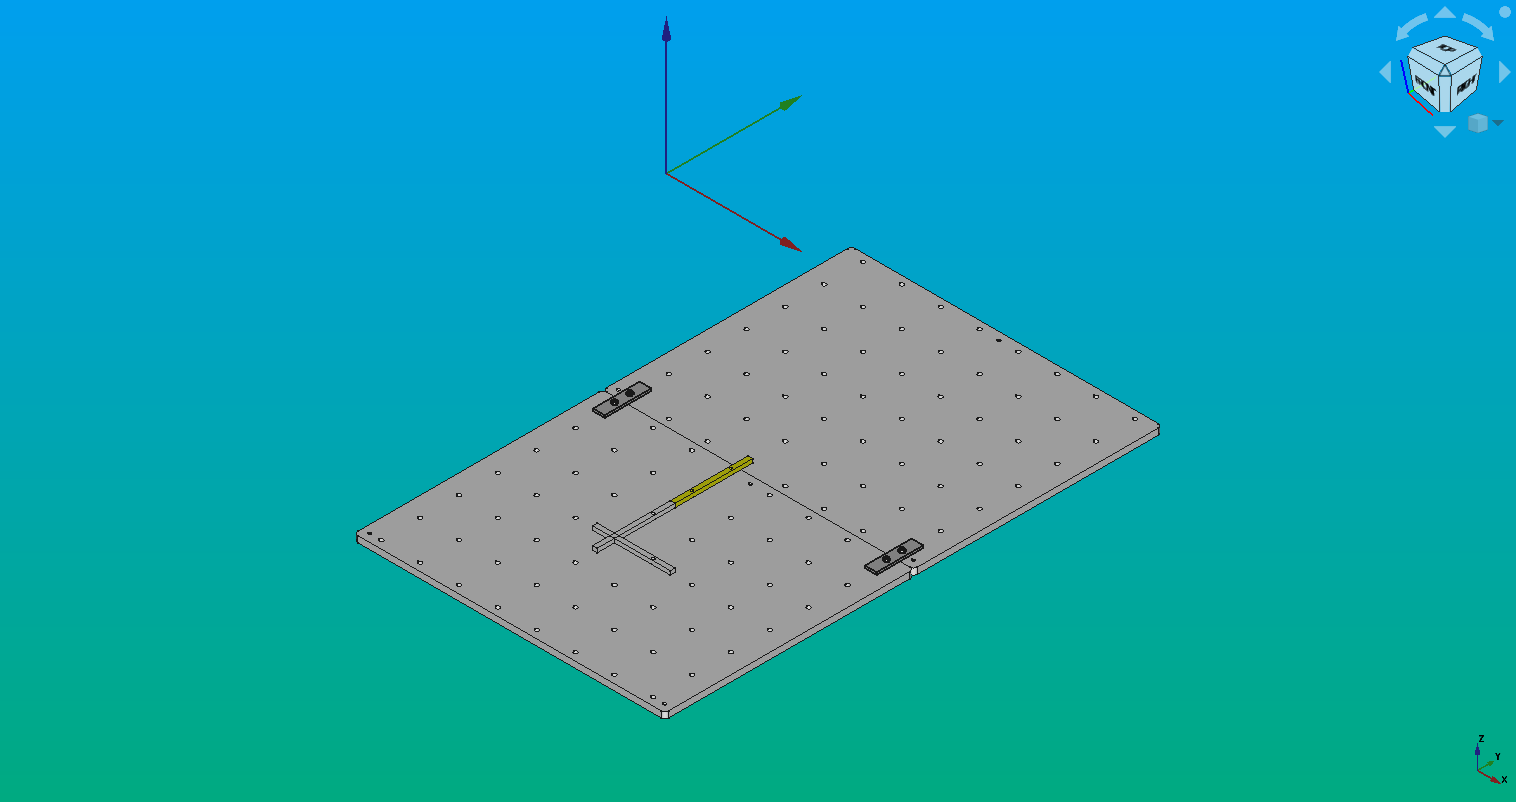
The anchors (the 3D-printed part in "L" shape) should be square with the machines coordinates, and will help align the objects, in both position and angle.
Once in place, the position of the objects must be calibrated in the GUI, such that the virtual representation is perfectly aligned with the physical deck.
Alignment
Alignment is the process of telling the robot where each object is located, making the virtual workspace match the physical deck exactly.
It is critical that tools, new platforms and anchors are calibrated to their anchors before using them, so we have guides for that:
Warning
Never use an uncalibrated tool, platform, or anchor, and always place the items carefully. Failing to do so will probably crash your robot and cause damage.
Using the UI
Usage guide for Pipettin Writer, a user-friendly web application for the Pipettin bot.
It provides an easy-to-use interface to:
- Create and run high-level protocols for the robot.
- Calibrate and manage your labware, workspaces, and tools.
Workspace view.
Create a workspace
Steps:
- Access the UI by opening a web browser, and visiting the app's URL and port, as explained in the access section.
- Click on the "New Workspace" card, a form will open.
- Customize your workspace by giving it a name and description, then click on "create".
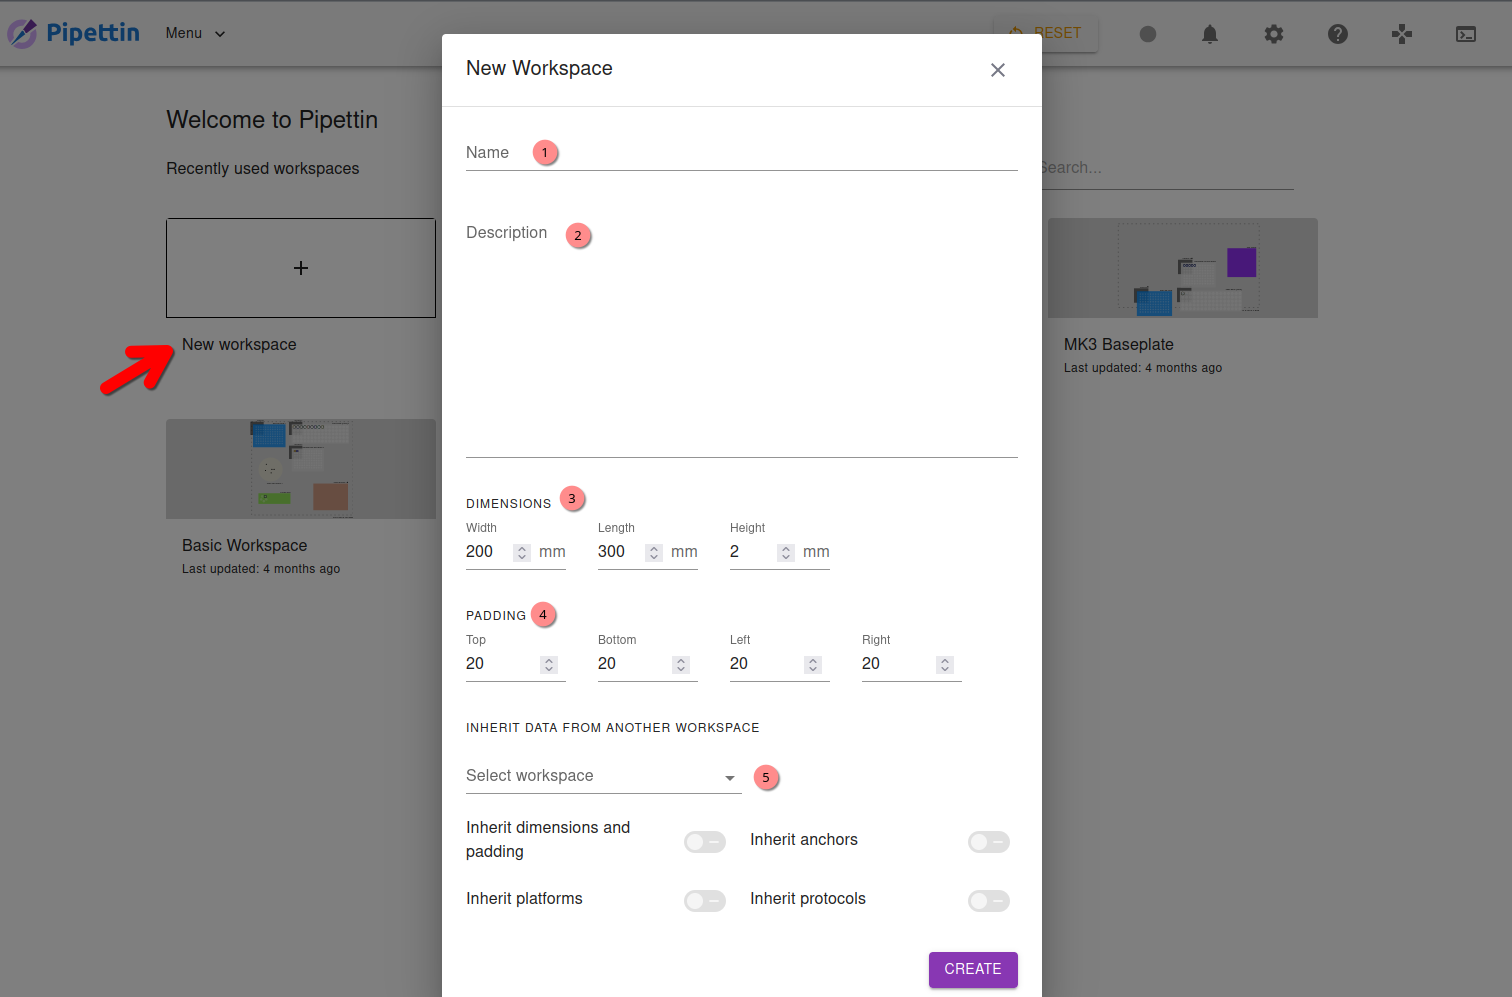
Workspace dimensions
In this step, it's important to set the dimensions of the virtual workspace to match the size of the basteplate (or actually, the motion range of the machine). To achieve this, you need to choose the weight, height, and length that correspond to your specific physical workspace.
Visual padding
Padding is meant to be used to center the initial view of the workspace, and does not need to match any real world dimension.
Congrats! You have created a brand new workspace.
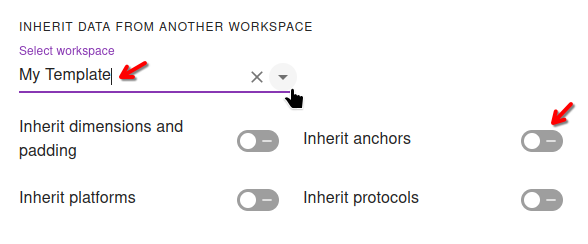
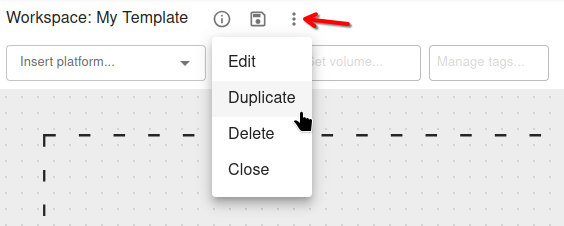
Inheritance
The workspace creation menu lets you copy over dimensions, anchors, platofrms, and protocols from previously defined workspaces.
You may find yourself needing to reuse workspaces, instead of starting from scratch each time.
To take advantag of this feature, create a "reference" workspace and save it as your template for new workspaces.
You can reuse it later on by:
- Creating an new workspace, and selecting which object you want to inherit from the template workspace.
- Opening the template workspaces, and using the 3-dot menu near the workspace's name to "Duplicate" the template.
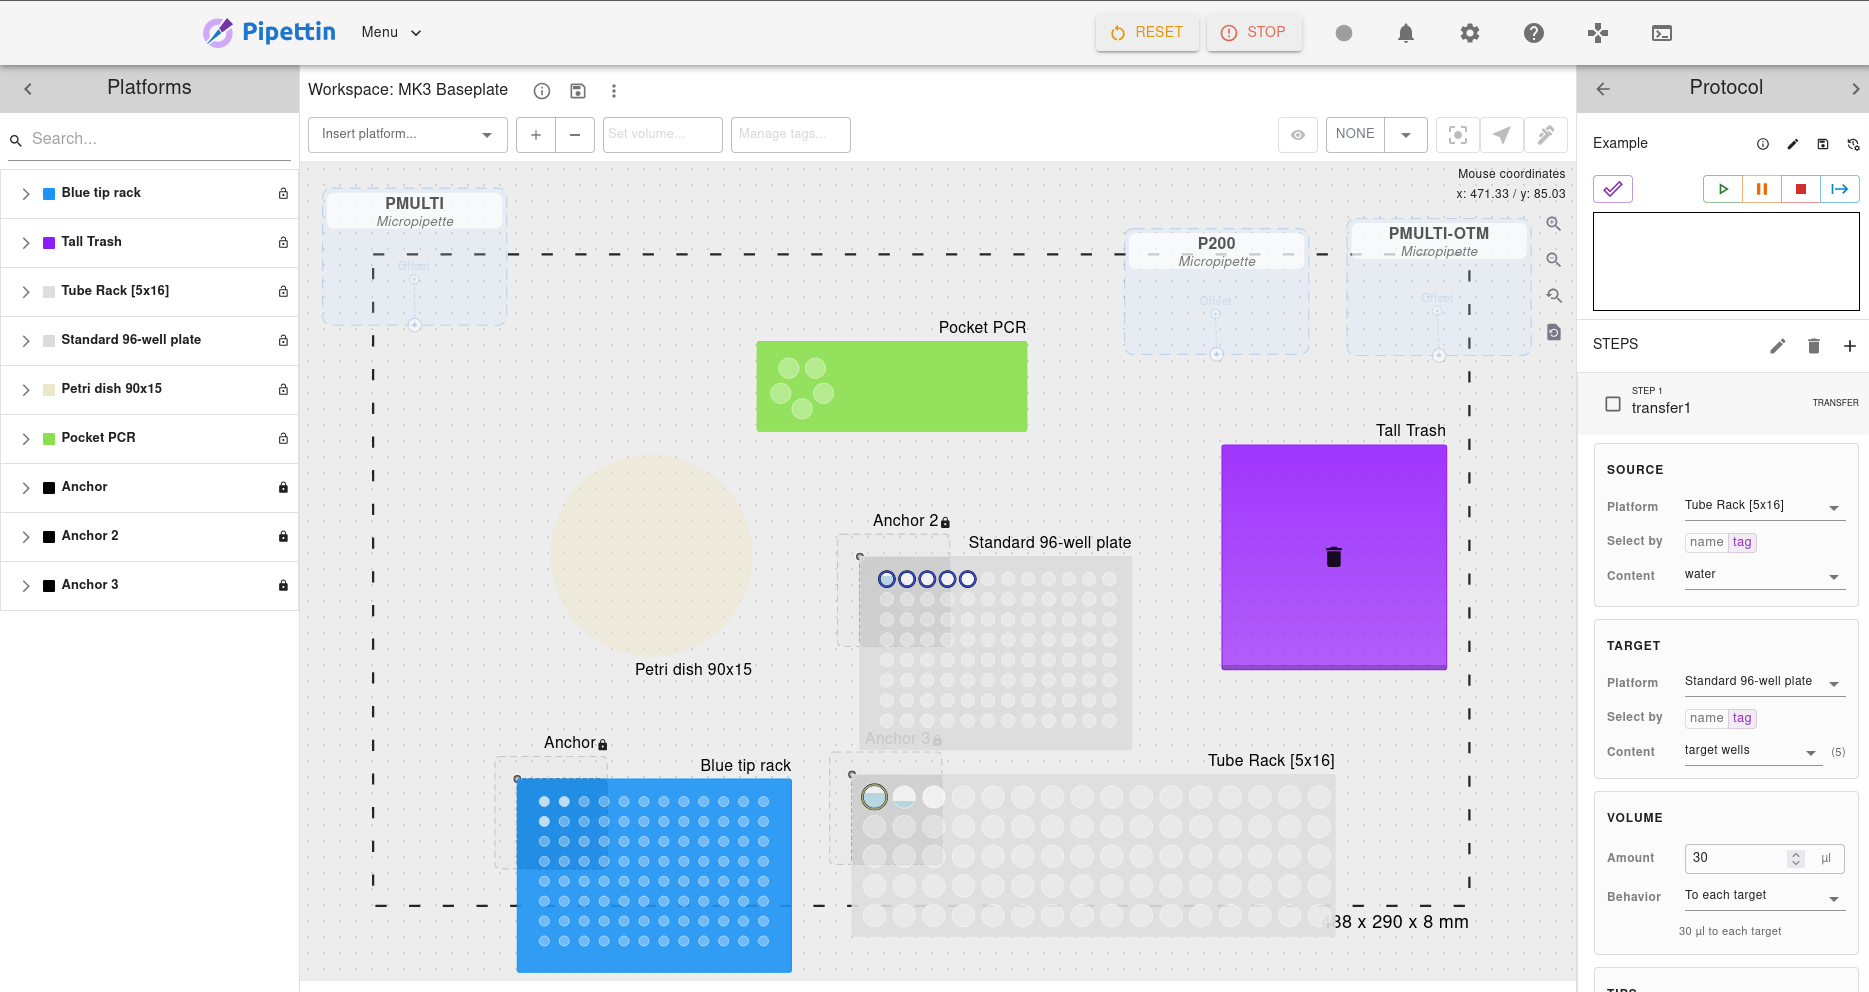
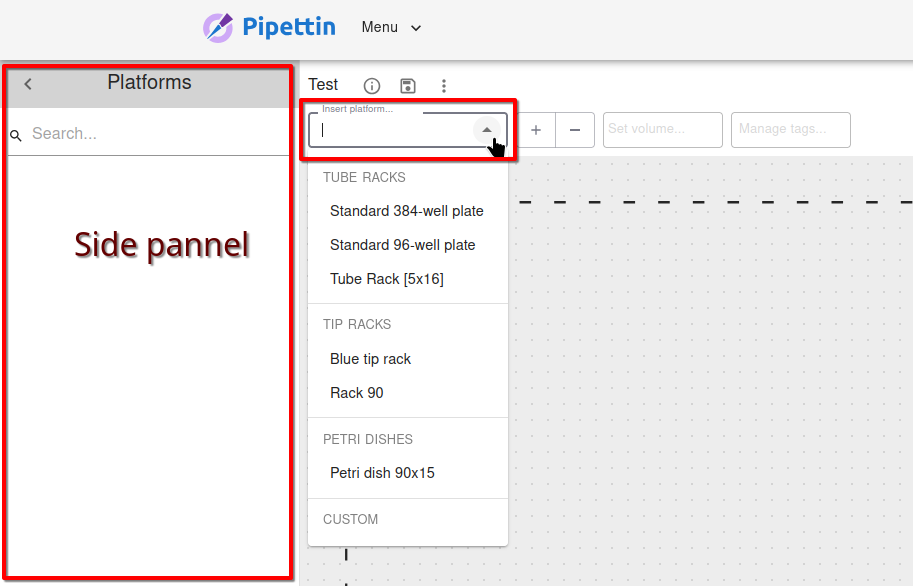
Insert items
Once the new workspace is created, you'll want to start adding platforms to your virtual workspace. The term "platforms" refers to all the objects that can be added to a virtual workspace, and serve as "platforms" for contents (e.g. tubes or tips).
The instances of these platforms on a particular workspace are called "items".
To add a new item:
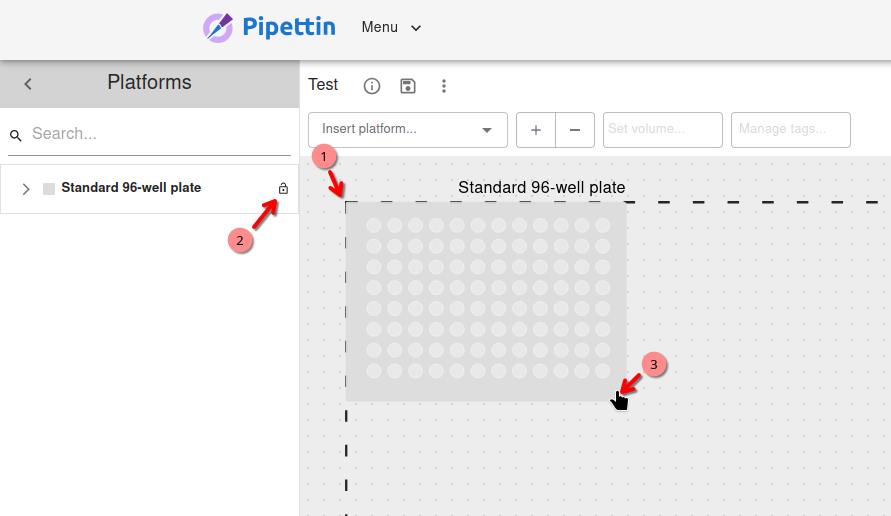
- Click on the "Insert platform..." drop down, and select a platform you want to insert.
- A new platform item will appear on the workspace centered at the origin (top-left).
- The item will also be added to the list of platform items, in the left side panel.
- To toggle the position lock of the item look for its entry in the side panel, and click on the lock icon 🔓.
- Select the new item by clicking on it, either in the workspace area or on the left panel.
- To move the item around:
- Drag it with a left click (more images below).
- Use the arrow keys on your keyboard for fine adjustment (bonus: PgUp/PgDown change the platform's Z coordinate).
- Use the arrow buttons on the top-right of the workspace for fine adjustment (bonus: PgUp/PgDown change the platform's Z coordinate).
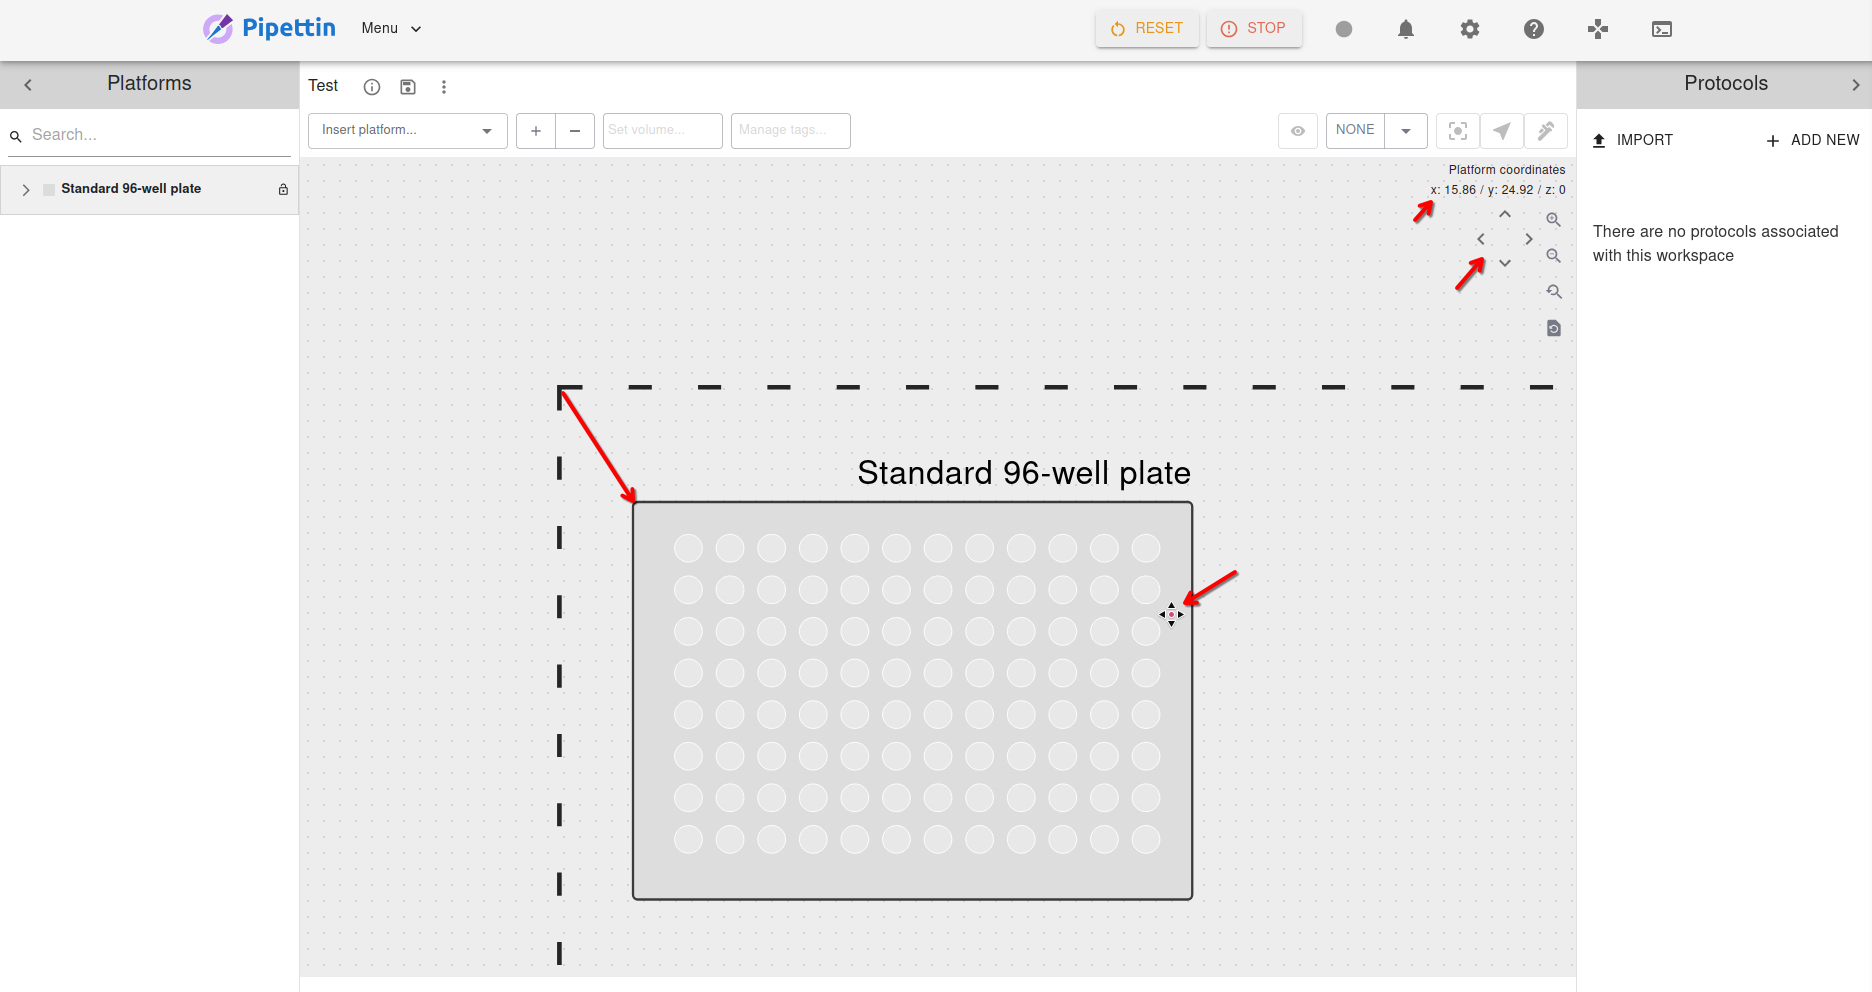
Coordinates and moves:
- The coordinates of a platform are relative to the origin of the workspace, the top left-corner of the large square drawn with dashed lines.
- Coarse movement is possible by click-and-drag.
- Fine adjustment is achieved with arrows.
- When a platform item is selected, its coordinates are shown on the top-right of the workspace.
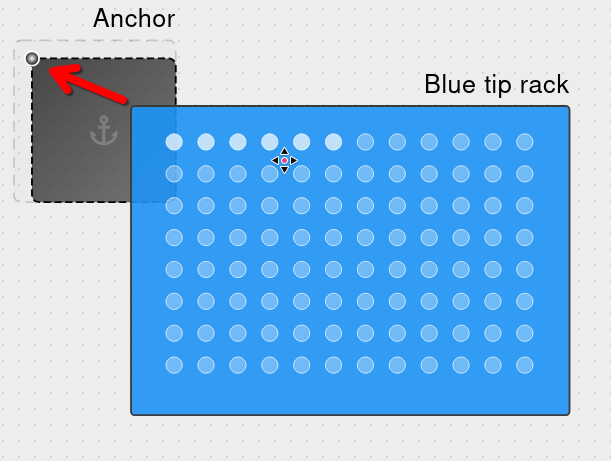
Use anchors
As explained previously, anchors allow you to repeatably align labware to a parituclar location of the baseplate.
Preamble
- Each anchor must be calibrated before usage. Make sure that your platform and anchor are correctly calibrated.
- The position of anchors should stay locked, to prevent acciental changes to their location.
- To add an anchor, use the insert platform menu.
- The anchor will be inserted in a locked state, remember to disable it to change its location, and locking it when calibrated.
Usage:
- Choose an anchor, and identify its anchoring point (indicated by a small circle, and an animated cue on mouse hover).
- Drag the platform item you want to use closer to the anchor.
- After releasing the item, it will snap to the anchor point, if its top-left corner is close enough to the point.
Add contents
Quick review: Platforms, Slots, and Contents
As explained before, each "item" on a workspace is an instance of a particular platform. As such, items only hold data about their state (e.g. location on the workspace).
An item's state is mostly about its contents: the list of things than are currently on it.
Platforms have predefined "slots" (e.g. a well, a tip spot, or a hole in a tube rack) on which contents can be placed, and each slot can hold a single content.
Exception: petri dishes have no slots; colonies can be placed freely on them.
Each content item is defined by:
- A reference to a container (e.g. a 1.5 mL tube).
- Its state (e.g. how much volume it currently holds).
- Which of the platform's slots it occupies.
- Other metadata (name, tags, ...).
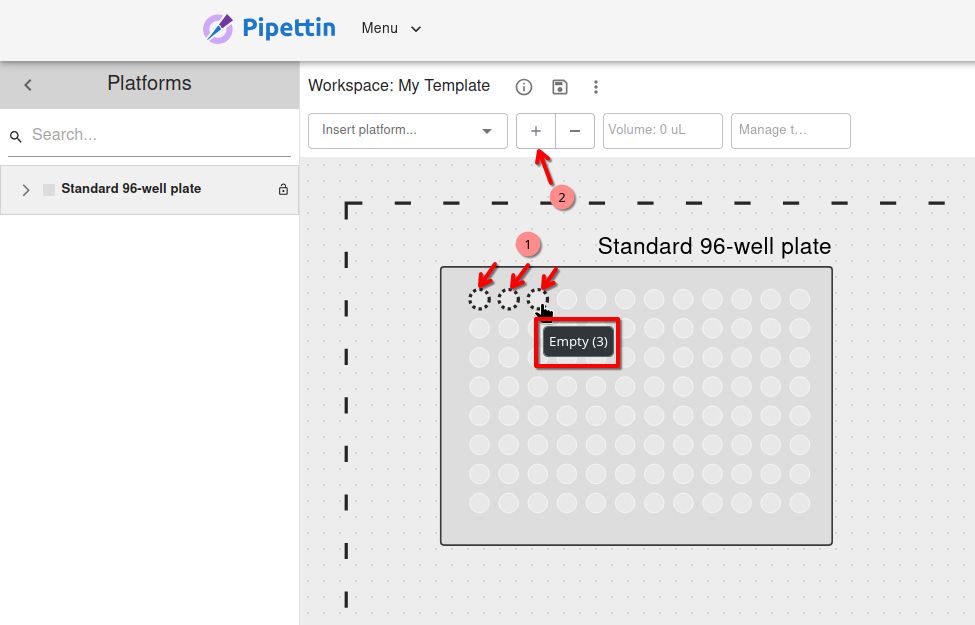
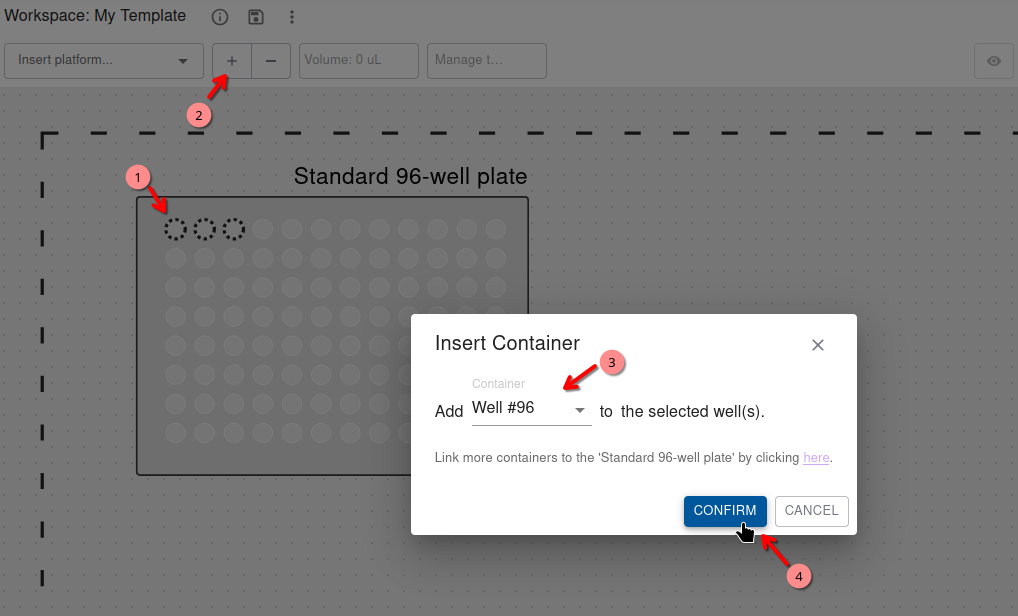
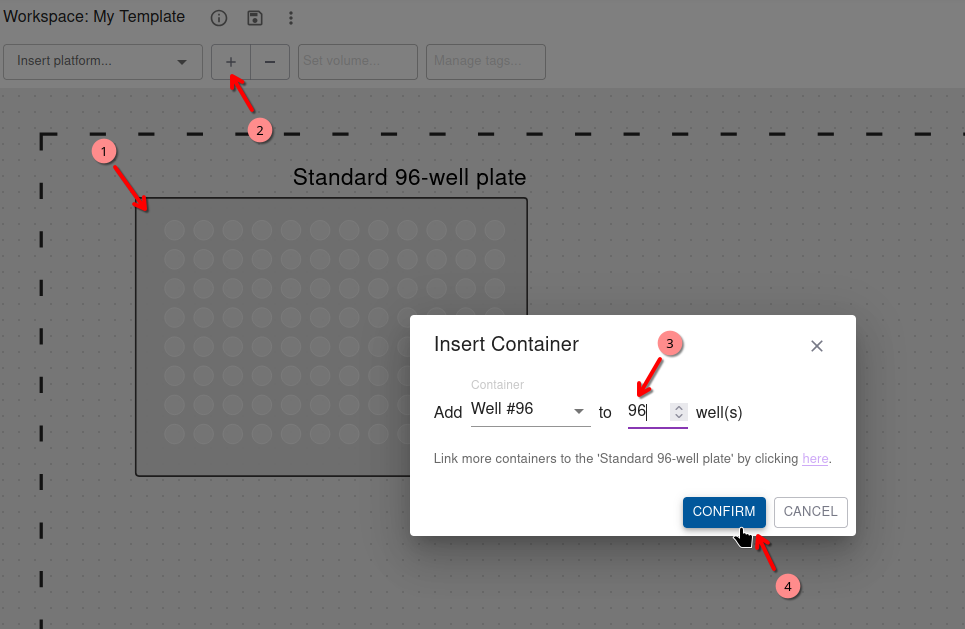
To add contents:
- Select a platform, and either:
- Select the slots you want to add contents to.
- Skip selecting slots, which will let you add multiple contents in slot-wise order.
- Hovering over empty slots will display their slot number.
- Click on the "+" (add container) button.
- Select the container to use.
- If did not select slots, set the number of containers to insert.
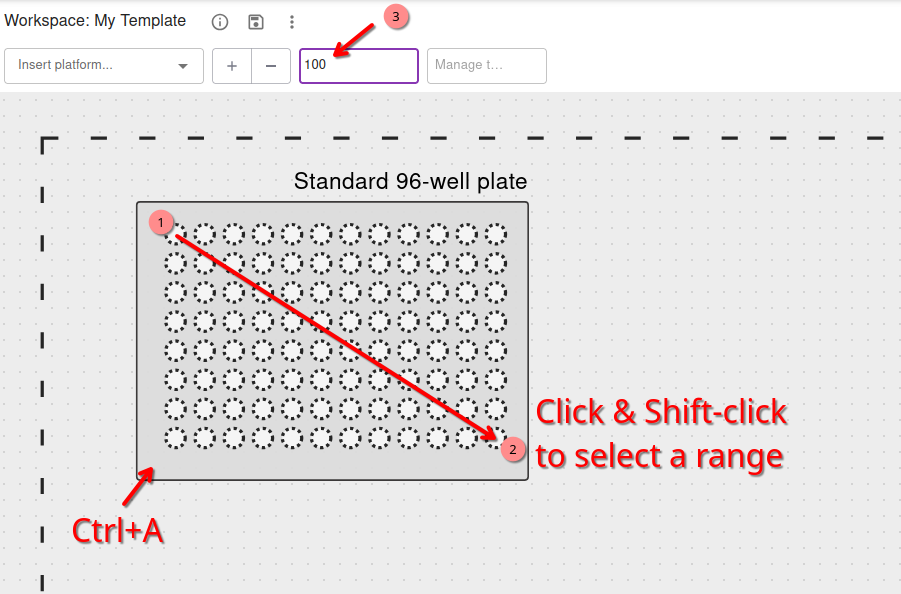
- Select the newly added contents.
- A single click will add or remove a slot to the selection.
Shift-clickwill select a range up to the clicked content, starting at the last selected content.Ctrl+awill select all slots in the platform.
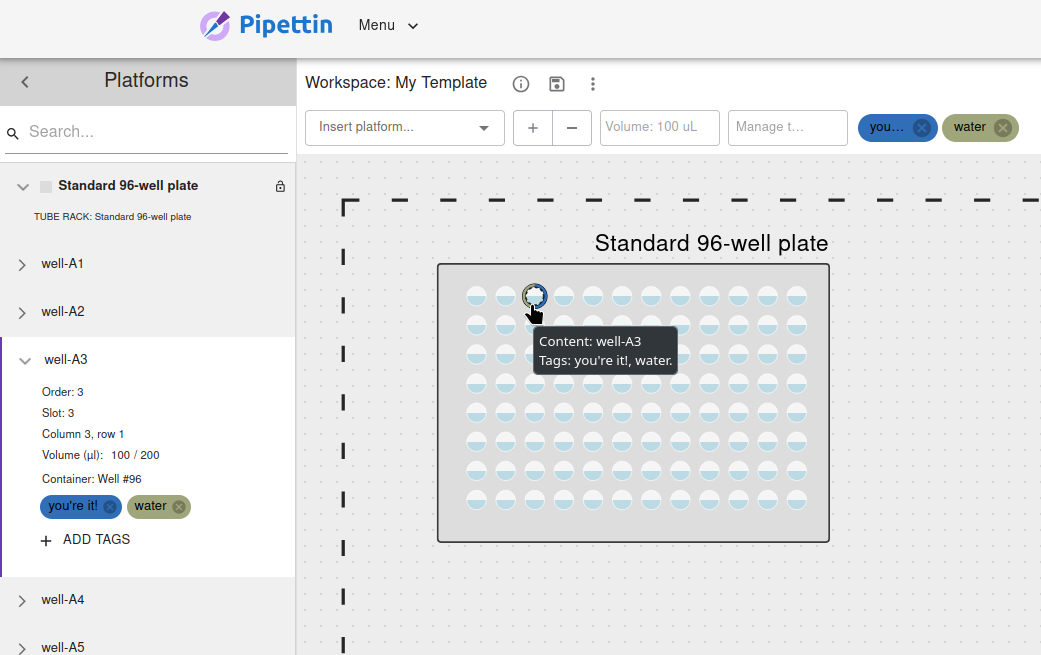
- Add volume and set tags for the selected contents by either:
- Using the bulk-volume and bulk-tagging fields on the workspaces toolbar.
- Editing the volume field on the left side panel.
The link between platforms and containers
A platform's slots are linked to the containers they can hold by geometric properties:
- The definition of a platform lists the available slots, and which of the containers they can hold (and with which Z-offset).
- The available containers and their geometric properties are stored in the app's database (e.g. a particular brand and model of tip).
Non-zero volumes
A tube must have non-zero volume to be used in a protocol as a source for pipetting steps.
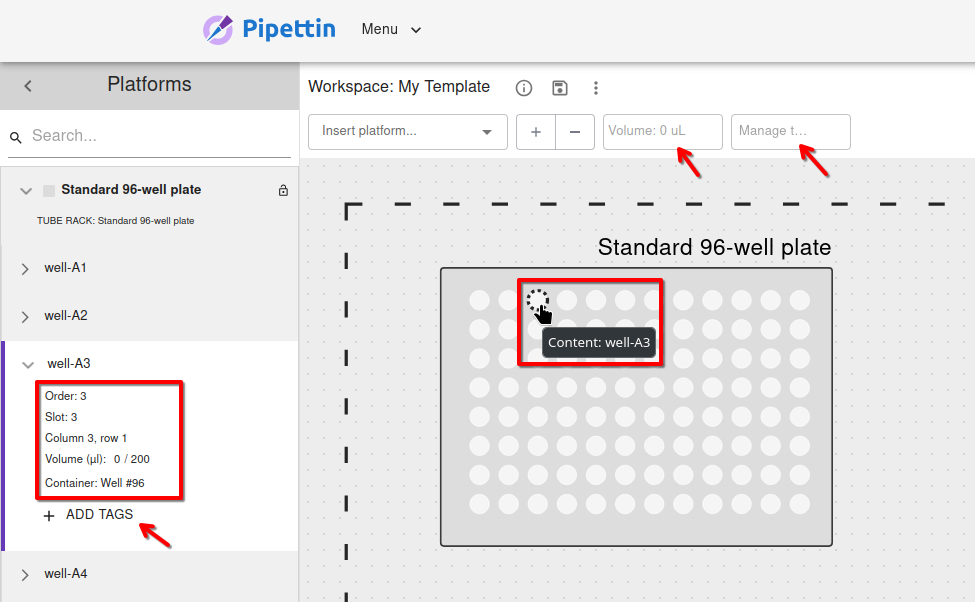
Left side panel
Once you've added platforms to the workspace, on the right part of your virtual workspace, you will se that all the platforms appear with its contents.
In this panel you will be able to go to the tube box section and select how much liquid you want to add in each tube and what (water, buffer, DNTPs, PRIMERS).
You can also organize, filter, and group contents by adding "Tags".
Create a protocol
Protocols are sequences of high-level steps, that you can define using the right-side panel of the UI.
Add steps
- Go to the protocols section on the right side of the GUI and click on "Add new protocol"
- Name your new protocol and write a simple description of it. Then click on "save"
Protocol templates
You will see that there is a template option in which you can select "PCR Mix". This type of configuration automatically puts all the tubes to do PCRs, and even the protocol. But on this tutorial we are gonna click "None" to show you more types of configurations.
Protocol panel menus
You will see these menus above the protocol configurations:
- ✔ Validate protocol: Once you finish your protocol click here check that your protocol is working correctly before you run it.
- ▶ Run protocol: Once you finish your protocol, start running it.
- ⏸️ Pause execution: Pause your protocol if you need to.
- ◼ Stop execution: Stop running your protocol if you need to.
- ➔ Continue execution: Resume running your protocol if you have paused it.
- Since the protocol is created with no steps, you need to click on "Add step".
- You will see a ton of options for your steps. Transfer, Wait, Human Intervention, Comment, and mix. Click on "Transfer".
- You'll se four main flaps; Source, Target, Volume and Tips. It might be helpful to use the "tags" option, as we used while adding platforms to the workspace.
You will be able to configure some important features of each step card.
Source
You can configure on which platform, with or without tags and what liquid your source is gonna be
Target
You can configure on which platform, with or without tags and what liquid your target is gonna be. If the option "sample" is selected while choosing the target, you will be able to see that below it says "Selected item(s): 2."
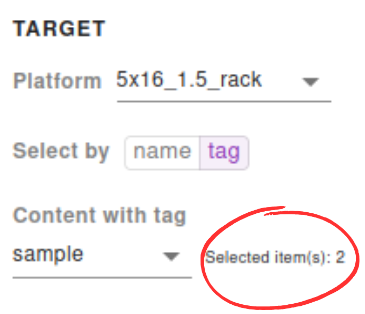
Two items (or more) were detected. That means that everything will be repeated for both tubes containing this tag, to avoid writing this step twice.
Volume
Select the volume you want to transfer
Tips
The tip's configuration options are pick from, discard to and behavior. Regarding this last one, there are three options of behavior (how to re-use the tips):
- Always re-use
- Avoid Target contamination
- Only avoid Source contamination
- Re/-use only the same source
The idea is that you configure the volume, since that volume can go, for example, in two different tubes. By doing that, you can use the same tip by repeating the pipetting without wasting tips.
This step can be repeated by adding a new step and changing some settings from the previous one.
- When you finish creating your protocol and adding the needed steps, click on "Save protocol"
A message should appear confirming that the protocol was validated.
Use templates
When creating a new protocol, you will see that there is a template menu

Templates are forms that prepare the workspace and protocol automatically, to avoid doing this in several steps.
You can custom your protocol template as you wish, specifying which tips you want to use, where to throw the discard tips, etc.
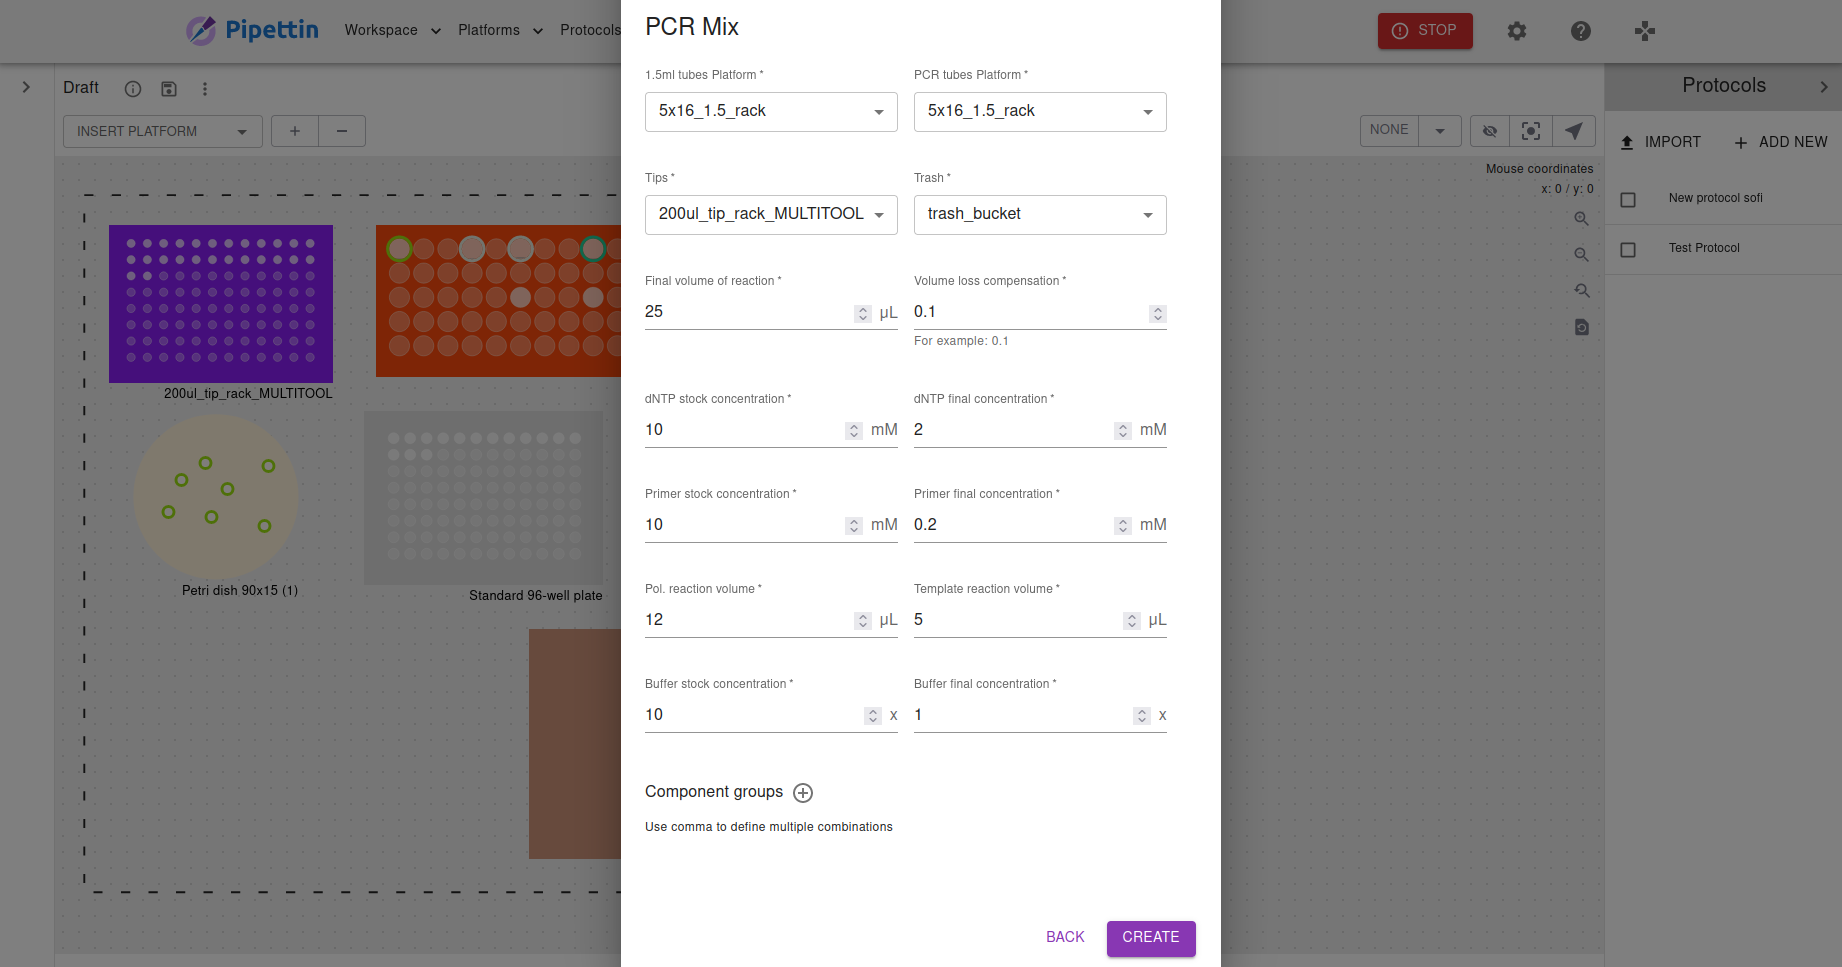
Pipettin Writer comes with its amazing PCRmix template:
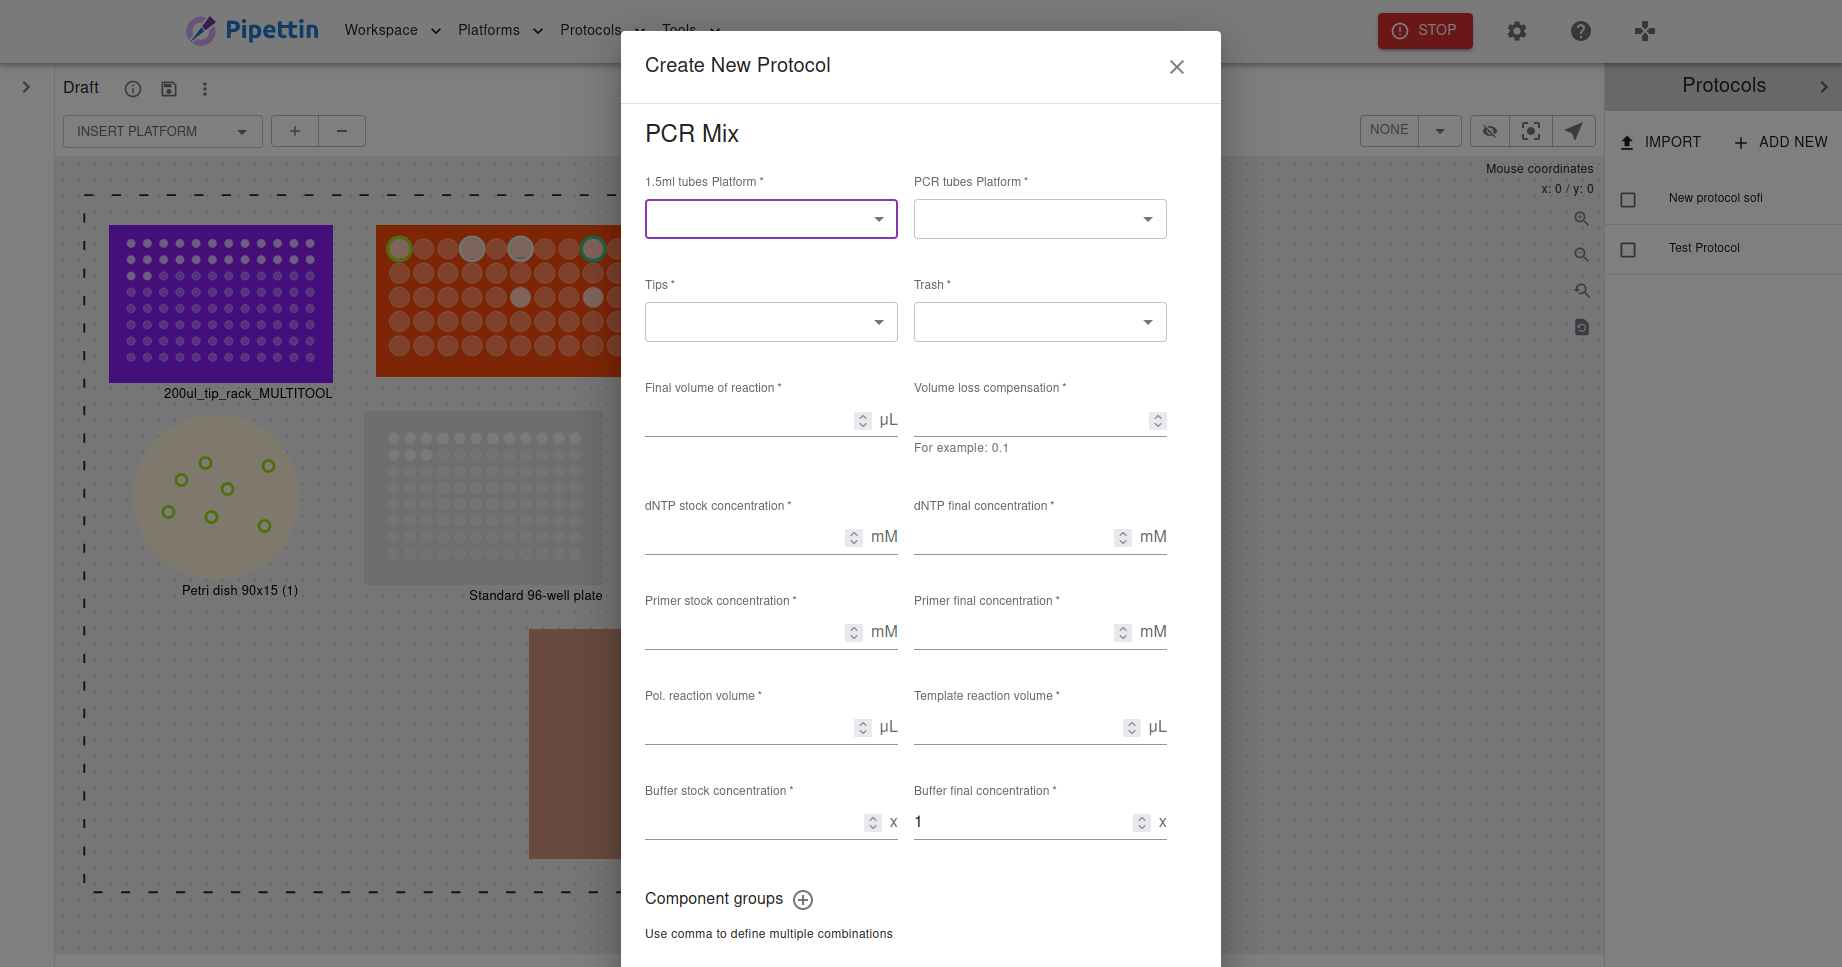
Complete it as you please, for example:
You will also note that the protocol template comes with "Component Groups"
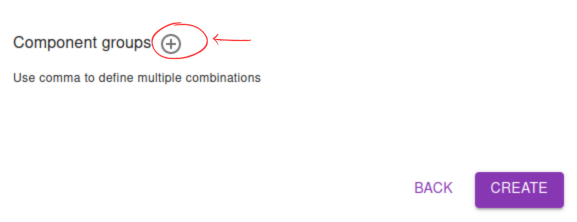
This is a space to add names to reactions. You can add as many groups as you want.
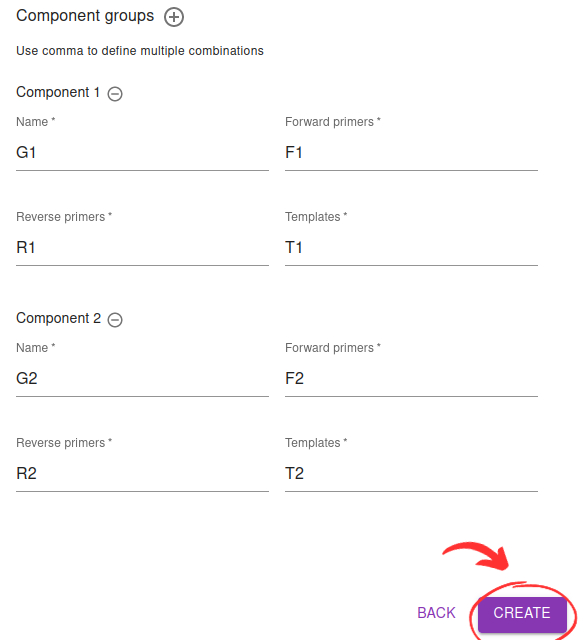
When you finished, click on the "Create" button. After that, you will see that the program inserts all the platforms and objects detailed on the protocol template, as well as all the protocol steps.
The next step is to click on "Save protocol", then click on "Validate protocol"
If an error message appears, it indicates an issue has occured. The error message will pinpoint the specific step where the problem exists. You can identify this by selecting the option labeled 'Error in step...' – clicking it will instantly navigate you to the location of the error on the page.
After solving the problem, you have to, once again, click on "Save protocol", then click on "Validate protocol".
Running protocols
Note: This section is missing a proper documentation.
This section should describe the different ways a protocol can be executed:
- GUI
- Mainsail (the "printer" control web-app)
- Using python (eventually)
Pre-run considerations
Note: This section is missing a proper documentation.
Execution
To-Do: Add video showing how the robot works when running any protocol
Write a protocol with Python
There are several ways to control the robot with "higher level" commands, from the included Jupyter notebooks.
To open the Jupyter Hub instance served by the robot's computer, visit your Pi's IP at port 8000 (as explained in the additional software guide).
You'll also need to stop the piper service first, and this can be done by opening a terminal in Jupyter Jub and running this command:
This "service" normall y runs in the background and interacts with the UI. And although Moonraker accepts multiple client cononections, the service may interfere with your usage.
Native
You can use piper's native methods to control the robot.
This python module has many components and plugins, but offers some simple use cases as well.
- Using our python modules directly.
- Writing steps and action commands with newt or manually (draft).
- To just send GCODE, you can use our Machine class, or write your own program to interact with Moonraker and/or Klipper.
PyLabRobot
We have implemented the basic backend for operating our robot on a fork of the PyLabRobot (PLR) library, a programatic frontend to many lab automation devices.
Beware
This library is meant to be used with Pipettin's SilverDeck only, and may be incompatible with many other of PLR's features.
Its development is ongoing. Feedback is welcome!
As a general rule, you should install python libraries to a virtual environment. Before installing PLR, create and actiate a new or existing environment:
python -m venv ~/venv-pylabrobot        # Only once.
pip install ipykernel                   # Once, if you want to use PLR from Jupyter.
source ~/venv-pylabrobot/bin/activate   # Each time the venv needs to be used.
To install our PLR fork, run the following command from your virtual environment:
pip install "pylabrobot[piper] @ git+https://gitlab.com/open-la/pipettin-piper.git"

# Or this one in a jupyter notebook.
# % pip install "pylabrobot[piper] @ git+https://gitlab.com/open-la/pipettin-piper.git"
We have prepared a few examples in a dedicated jupyter notebook to help you get started.
Science Jubilee
SJ is another library for lab automation, made for doing science with a Jubilee 3D printer and integrated scientific instruments.
WIP
Machine integration in progress.
- Modularization of Pipettin's machine class.
- Implementation of a Machine class for Science Jubilee.
- Integration of Science Jubile into Piper, to control a Jubilee with the same stack.
Troubleshooting
- What if something goes wrong?
- Interrupted protocols.
- Controller resets and loss of homing state.
Note: This section is missing a proper documentation.
Congrats
Congrats! You've automated your lab life. Isn't that nice?
Although a better question could perhaps be: But at what cost! (?)
Navigation:
Previous: ← Calibration Guide | Next: Drinking Mate Guide →